Agency Branding Setup
Your agency's branding determines how your white-label directory looks to clients and providers. This includes your logo, color scheme, fonts, and the preview of how everything appears together.
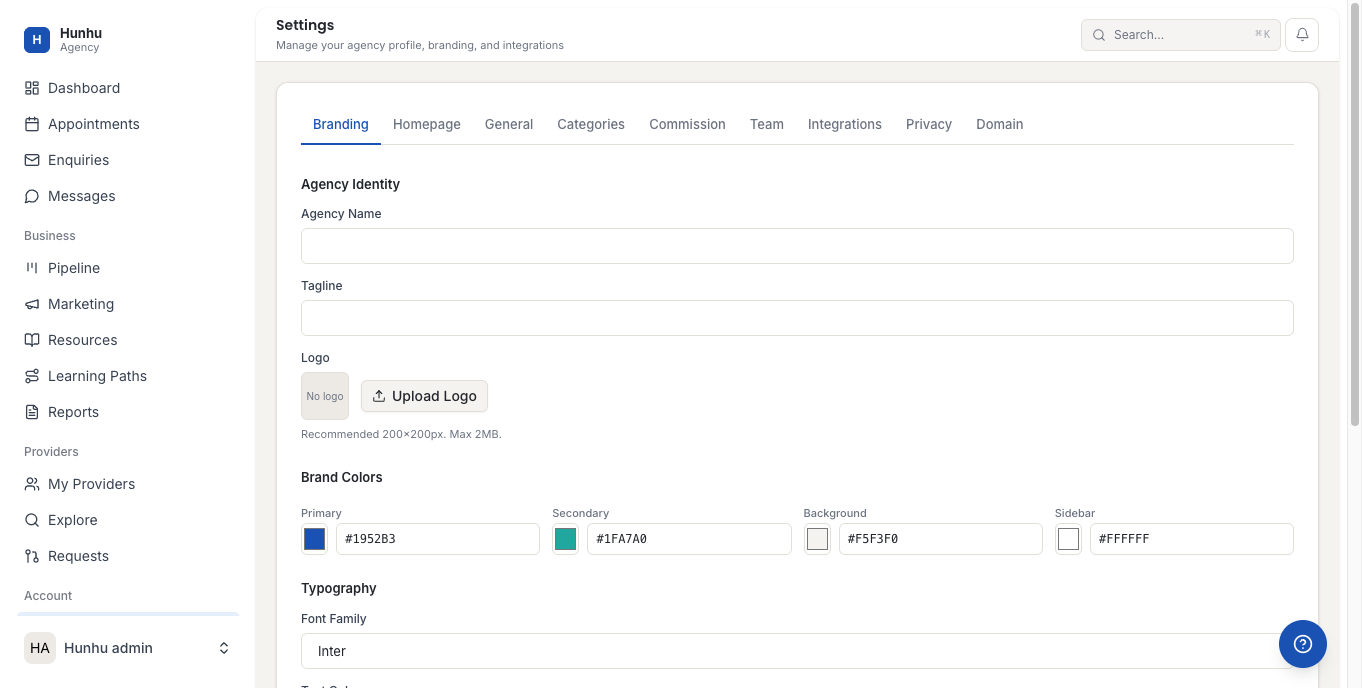
Accessing Branding Settings
- Log in to the Agency Portal at admin.hunhu.us/agency.
- Click Settings in the left sidebar.
- The Branding tab opens by default.
Setting Your Agency Name and Tagline
- In the Agency Name field, enter the name that appears in your directory header and emails.
- In the Tagline field, enter a short phrase that describes your agency's focus. This appears beneath your agency name on your directory homepage.
Uploading Your Logo
- Under Logo, click Upload.
- Select your logo file from your computer. Supported formats are PNG, JPG, SVG, and WEBP.
- Requirements:
- Recommended size: 200 x 200 pixels
- Maximum file size: 2 MB
- The logo appears in the live preview on the right side of the page once uploaded.
Tip: Use a PNG file with a transparent background for the best results across light and dark sidebar configurations.
Setting Brand Colors
- Under Brand Colors, you will see four color pickers:
- Primary Color - Used for buttons, links, and key interactive elements
- Secondary Color - Used for accents and secondary actions
- Background Color - Main content area background
- Sidebar Color - Navigation sidebar background
- Click any color swatch to open the color picker.
- Enter a hex code directly (e.g.,
#1952B3) for precise brand color matching, or drag the picker to select a color. - Changes appear in the live preview immediately.
Choosing a Font
- Under Font Family, click the dropdown. The default is Inter.
- Select a font from the list. Available options include system fonts and Google Fonts.
- Set the Text Color to ensure readability against your chosen background.
Uploading a Custom Font
If your brand uses a proprietary or licensed font, you can upload it directly.
- Under Custom Font Upload, click Upload Font.
- Select your font file. Supported formats: .woff2, .woff, .ttf, .otf.
- Once uploaded, your custom font appears in the Font Family dropdown and becomes active automatically.
Note: .woff2 format is recommended for best performance and broad browser compatibility.
Previewing Your Branding
- The Preview panel on the right side of the Branding settings page shows a live rendering of your logo, colors, and fonts as they will appear in the directory.
- Adjust any settings and the preview updates in real time.
Saving Your Changes
- Once you are satisfied with the branding, click Save Changes in the top right corner.
- Your new branding applies immediately to your agency's directory for all visitors and logged-in users.
Was this helpful?
Still need help?
Our support team is here for you. Send us a message and we'll get back to you within 48 hours.